1. Choosing the Right Grill for Your Backyard Setup
The foundation of any great BBQ experience starts with selecting the right grill. Charcoal grills offer that classic smoky flavor many https://www.guibbqirvine.com/ enthusiasts crave, while gas grills provide convenience and precise temperature control. Kamado-style ceramic grills excel at heat retention and versatility, allowing you to sear, smoke, and bake. Pellet grills combine the ease of gas with authentic wood-fired taste. Consider your budget, cooking frequency, and available space before purchasing. A 3-burner gas grill suits most families, whereas a 22-inch charcoal kettle is perfect for beginners. Always assemble your grill on a flat, non-flammable surface away from structures. Remember to season a new grill before first use by coating grates with oil and burning at high heat for 15 minutes. Proper airflow management is crucial; learn your grill’s hot spots by placing bread slices across the grate and toasting them evenly. For consistent results, invest in a dual-probe meat thermometer and a grill brush with replaceable heads. Finally, keep a fire extinguisher nearby and never leave a lit grill unattended.
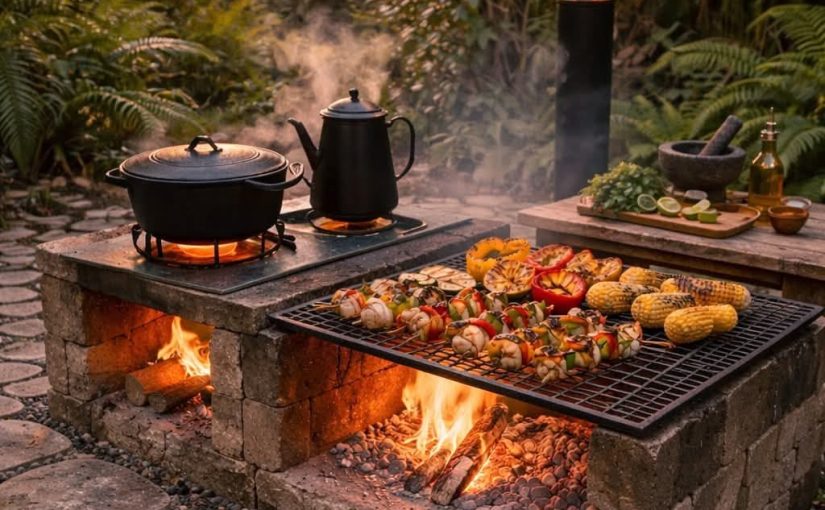
2. Mastering Fire Management and Temperature Zones
Creating two distinct heat zones on your grill is the secret to professional-level cooking. Direct heat (high temperature directly under food) sears steaks and burgers, while indirect heat (low temperature away from flames) gently cooks larger cuts like whole chickens or ribs. For charcoal grills, pile coals on one side only; for gas grills, light one or two burners and leave others off. Target temperature ranges: low (225-275°F) for smoking, medium (300-350°F) for chicken and vegetables, high (400-450°F) for searing steaks and chops. Use your hand to gauge heat: hold palm 5 inches above grate; if you pull away after 2 seconds, it’s high heat (450°F+); 4 seconds equals medium (350°F); 6 seconds is low (250°F). Never lift the lid unnecessarily; each opening allows heat to escape and adds 5-10 minutes to cooking time. For charcoal, light briquettes in a chimney starter without lighter fluid for cleaner flavor. Wait until coals are ashed over (about 15 minutes) before spreading. Manage flare-ups by moving food to indirect heat and trimming excess fat from meats.
3. Prepping Meat and Vegetables Like a Pitmaster
Proper preparation transforms good BBQ into unforgettable BBQ. Remove meat from refrigerator 20-30 minutes before grilling to ensure even cooking. Pat surfaces completely dry with paper towels; moisture prevents browning and crust formation. For steaks, chops, and chicken pieces, salt generously 40 minutes prior to cooking or immediately before grilling to avoid drawing out moisture. Trim excess fat to 1/4-inch thickness to prevent flare-ups while maintaining juiciness. Tenderize tougher cuts like flank or skirt steak with a mallet or marinade containing acidic ingredients (vinegar, citrus, yogurt) for 2-4 hours. Vegetables benefit from uniform cutting sizes; toss zucchini, bell peppers, and onions in olive oil, salt, and pepper. Skewer soft vegetables separately from dense ones like potatoes. For burgers, handle ground meat minimally—overworking creates dense, tough patties. Make an indentation in each burger center to prevent bulging during cooking. Brush corn on the cob with butter and wrap in foil. Always oil the grill grates using a paper towel dipped in high-smoke-point oil (canola, avocado, or grapeseed) right before placing food.
4. Step-by-Step Grilling Process for Foolproof Results
Follow this sequence for perfectly grilled food every session. Start by preheating your grill with the lid closed for 10-15 minutes until the grate temperature reaches your target. Clean grates thoroughly with a wire brush, then oil them. Place food on direct heat: sear steaks 2-3 minutes per side for medium-rare; burgers 4-5 minutes per side; chicken breasts 5-6 minutes per side. Use tongs instead of forks to pierce meat less and retain juices. After searing, move thicker cuts to indirect heat to finish cooking without burning exteriors. Insert a meat thermometer horizontally into the thickest part: chicken (165°F), pork chops (145°F), beef burgers (160°F), steaks (130-135°F for medium-rare). Flip food only once—constant flipping prevents crust development. Baste with sauces only during the last 5-10 minutes to avoid sugar burning. For vegetables, grill directly over medium heat 3-4 minutes per side until charred and tender. Rest all meats on a cutting board loosely covered with foil for 5-10 minutes before slicing; this allows juices to redistribute. Slice against the grain for maximum tenderness.
5. Post-Grilling Care and Flavor Enhancements
The final steps guarantee safety, cleanliness, and superior taste. Resting periods vary: 5 minutes for burgers and sausages, 10 minutes for steaks and pork chops, 15-20 minutes for whole chickens or roasts. During resting, finish with compound butters or finishing salts—mix softened butter with garlic, herbs, or blue cheese, then chill and slice over hot meat. For extra smokiness, add soaked wood chips (hickory, mesquite, apple, or cherry) to charcoal or a smoker box on gas grills. After cooking, burn off residue by running the grill on high for 10 minutes, then brush grates again. Once cool, wipe exterior with soapy water and remove ash from charcoal grills promptly to prevent rust. Store propane tanks outdoors away from sunlight. To fix dry or overcooked BBQ, serve with flavorful sauces: Kansas City sweet tomato-based, Carolina vinegar-pepper, or Alabama white sauce. Leftover grilled meats shine in tacos, sandwiches, or salads. Finally, keep a grilling journal noting temperatures, times, and results to replicate successes. With practice and this guide, your backyard will become the neighborhood’s favorite BBQ destination.